title

Showing posts with label Project Nigella. Show all posts

5.6.12

Sugar Anenomes and Photographic Memories


Woah so it's been a long time! Nice to see ya! A lot's been going on, and a lot of it hasn't been blogging. But here we are!

It's the bank holiday weekend. We went to AppleCart Festival, we had friends round for dinner, we watched the Jubilee concert, and i made a sugarcraft anemone. Sugarcraft is brilliant, it's like play-doh for adults. You can spend half an hour making something and sticking your tongue out in concentration, and pretend you are 'skilled' instead of just 'a toddler'.


To make this little experiment i stocked up at the excellent Craft Company  who delivered super quickly! I used the blossom-white sugar flower paste, which as you can see is quite pink. It comes in a resealable plastic pot, and is just soft, so you can work it a little and soften it up, shape it, and then it hardens completely in a few hours. I also got some edible glue to stick it all together, and used some black glitter flake to cover the centre (which was made of a ball of the blossom-white icing)

To shape the petals i followed Domestic Sugars excellent tutorial. I didn't have a special ball tool, i used a 1/2 tsp measuring spoon, and i used spoons to lay out the petals, but the sponge is 100% vital, i couldn't have shaped these on a solid surface!

I have so much anemone love right now

Flowers and photo by Saipua

In other news, we just confirmed that the truly awesome Chris Barber will photograph our big day! I came across his photos through work waaaaaaay before we got engaged, and loved it. So i showed the boy, and he loved it too. We've looked around, there have been a couple of super close seconds, but Chris was our first choice from the start, before we picked a venue or even thought about any other things, so we are super excited to have him on our team.

Happy dance!

566

7.4.12

LittleMissLove on Rock N' Roll Bride!


What a big couple of days i'm having! Yesterday we booked our W venue, eek! It was actually the first place we saw, we then went to a few others but nothing matched up. I won't say too much, but it's a big country house where we can have the whole weekend, and go all out on the DIY decor. The one thing we decided right from the start was that we wanted our day to be aaaaaaall ours - no set menus and wedding planners here. This venue definitely lets us do that.

And, with a touch of serendipitous timing, today one of my articles has been published over on Rock N Roll Bride! Kat, the pink haired ed, is celebrating her birthday today and has shared my ombre cake tutorial. Happy birthday Kat!

To all the other DIY (read: stubborn control freak) brides, go read Rock N Roll Bride for a ton of inspiration, and an every day reminder that if you don't follow every tradition, that's A-Ok!

If you'd like your post to feature here on littlemisslove, whether it's W theme or not, drop me a line, i'd love to share some DIYs, or gorgeous photos, or whatever else you think might suit these chevron pages!  email littlemisslove@mail.com


7.3.12

How To Make Dim Sum With Ping Pong


Tonight the boy and i went to Ping Pong, our favourite dim sum restaurant, for a dim sum making masterclass. It was a fantastic way to unwind after a stressful day! We were given a complimentary glass of flowering jasmine tea, before settling in to a demonstration by one of the masters from the Ping Pong kitchens.


He, of course, busted out a perfectly formed beautiful little dumpling in about a millisecond. As with all things though, it was not as easy as it looked! We were all given some pre-prepared pastry circles (we were told it takes 1-2 years to master the pastry preparation, no time for that this evening!) and a bowl of spicy mushroom and vegetable filling. We then had a go ourselves!


Our teacher was strict, and made us do it again and again until we did it ok - not perfect, but ok. He was firm but fair, and wouldn't allow our fat fingers to get away with tearing the pastry or 'letting it run away' from us. At the end we got to box up all the little parcels we'd made and take them home to steam tomorrow, along with a little goody bag of lovely Ping Pong bits and a recipe to make the dim sum from scratch at home. Best wednesday night!

Ping Pong are running these classes at different branches each Wednesday in March, to celebrate their new Spring menu. The classes are free, and there are only ten places on each, so call up and book now to get a place! Details of how to book the Dim Sum Masterclass are here


3.3.12

How to do ombre icing


This weekend i'm meeting with my bridesmaids to be, to watch the awesome Bridesmaids film, drink cocktails and have a gossip. Of course, i need a cake for every occasion! So i made a lemon sponge with blackcurrant jam in the middle. I tried out ombre icing for the first time - a gentle graduation of colour from light to dark. Here's how!


1. Firstly, cover the cake in white soft icing, this is called a crumb layer, and it smooths out your palette. I cheated and bought a tub of Betty Crocker ready made frosting, since you can't buy white butter in the UK (unlike the US) so you can't make white buttercream at home. If you do want to go fully DIY just make a cream cheese frosting, that way it will stay nice and white (and it's delicious!)


2. Put a generous spoonful of white icing in the middle, then in a seperate bowl mix a little red food colouring into your icing. It's best to use a gel colouring, so that it doesn't thin out the icing. Using a spatula place a messy circle of this light colour around the white, then add a bit more colour into your bowl, and do a final darkest layer


3. Get the thinnest rubber spatula you can find - mine is about 1" across, but i could have done with one 1cm across for a better effect. Starting in the centre of the cake do a spiral all the way to the outside edge, done!

This also looks amazing done around the outside of the cake too.

Now, i have cake to eat and cocktails to drink, bye!

10.12.11

Home Made Christmas: How to make dried orange decorations


Tis the season to be jolly! For the first time since living with my parents we have a real tree this year, so i felt that it deserved some extra special, extra fragrant, extra festive decorations!

How to make dried orange slices
Slice a bag of oranges into 1cm thick slices
place them directly onto the wire rack in the oven
Cook for about three hours on 100C
Leave to cool!

I have used these all over the house. Some of them i've threaded ribbon through and hung on the tree


Others i have left in a bowl on the living room radiator, they smell amazing!


And i also made a super simple wreath for the front door. Here's how...

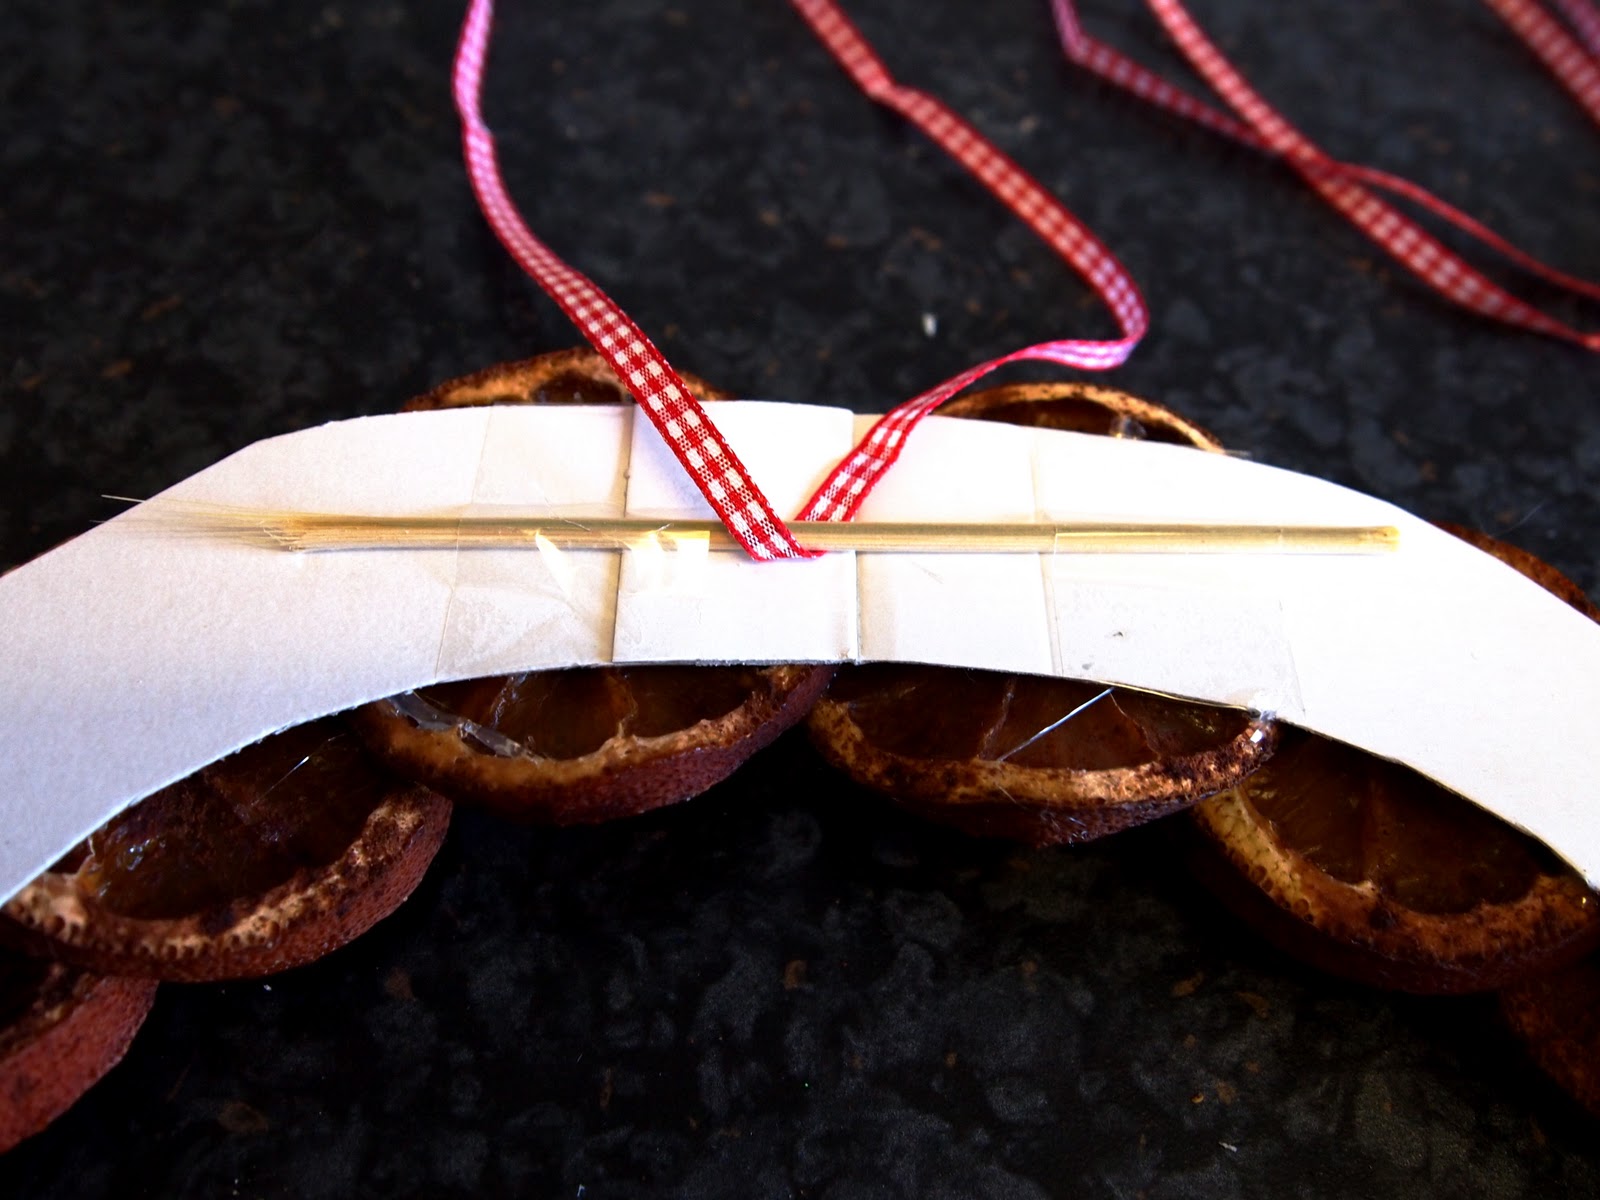
1. Cut a circle of cardboard the size of a dinner plate
2. Use a length of wood (i used a BBQ skewer, but a pencil or pen or something like that would work too!) to reinforce the top and bottom of the card. I just taped them on.
3. You can thread a length of ribbon through one piece of wood, to hang the wreath with later.


4. Using a glue gun, stick you orange slices on, each one slightly overlapping the last


5. finish it off with a bit of sparkle, and a pretty bow, and hang it on your door!


Tonight is my annual christmas tree decorating party, so i have been a busy bee making lots of festive buts and bobs. I'll post up some more simple how-tos in the next few days!

25.9.11

Project Nigella: Goody two shoes granola


OK, so i know home-making granola is really a very Nigella/Delia/Stepford Wife/Bree VanDerCamp thing to do, but i just fancied experimenting, and i'd never made it before! It was really easy peasy, and i can control how much sugary badness is or isn't in it. So i may well do it again!


In a big bowl, mix together 2tbsp vegetable oil, 150ml maple syrup and 2tbsp honey (or you can switch both of these syrups for agave nectar, if you want to be really saintly!) Add a teaspoon of vanilla extract.

Add in 300g of rolled oats. Past this, it's up to you! At this stage you want to add around 250g of mixed nuts and seeds. I used a bag of Omega Sprinkle  from Holland and Barrett - it contains pumpkin, sunflower and sesame seeds, with linseed and golden linseed. Super good for you, providing a slow release of energy and it really will fill you up!


Put all this onto two baking sheets, and cook for around 20 minutes at 160o/c. Then add in whatever yummy bits and bobs you fancy! I added raisins, dried cranberries, dried apricot, and dessicated coconut. Bake for another 15 minutes, cool and store in an airtight container. In theory it will last about a month. In practice we've nibbled away at it and eaten half of it already!

Project Nigella: Chocolate Courgette Brownies

cam to gif


Yes, you read that right. Courgette. In a brownie. I have reached new levels of baking madness.

(By the way, if you work for Lomography UK, and were looking forward to your monday treat, but are now wondering how you're going to hide it under your keyboard or in a film canister and pretend you've eaten it, go with me here! Just give me two minutes..)

So yesterday Dikki and i went to visit my friend and fellow hooper Gina, and her husband Wayne. I make hula hoops, and Gina wanted a custom size so came to me. She had previously mentioned that as Wayne is the caretaker for a college they live onsite in the school house, so i delivered the hoop to her and took the opportunity to see their amazing home and massssssssive garden - featuring a rather impressive vegetable patch where they've had a great season of giant onions, giant squash, giant kale and giant courgettes. They very kindly picked us some fine specimens and sent us home with proper local dulwich organics!

As usual, i was already planning to do some baking today, but the courgettes had me googling. I'd been half planning to make carrot cake, so thought i'd do carrot and courgette cake, but when i came across a recipe for chocolate courgette brownies on the Corner Cottage Bakery Blog my plan was sealed! (Dikki was not convinced)


I adapted the recipe slightly, adding crushed walnuts, milk and white chocolate chips for a bit more texture and added sweetness. I also changed some of the quantities by a teeny bit. Here's what i did...

Ingredients
120ml vegetable oil
200grams caster sugar
100g dark brown sugar
3tsp vanilla extract
250gram plain flower
70gram cocoa (it really is worth using the best you can get. I think the richness of the Green & Black's really helps these brownies)
1.5tsp baking powder
pinch of salt
250gram courgette, peeled and grated
Chocolate chips and walnuts optional

Method
1. Preheat the oven to 180o/c
2. Mix together vegetable oil with the sugars and vanilla
3. Stir in the flour, cocoa powder, baking powder and salt
4. Stir in the courgette, chocolate chips and walnuts until it's all mixed together and you can't see any green courgette anymore
5. Spoon the mixture into an oven tray lined with greaseproof paper. Bake for 25 minutes

As Hanna says on the original recipe, and as you can see in the picture above, it does make a very dry batter. The more you stir it the moister it gets, as the water comes out of the courgette. I think i should have stirred mine a bit more, or maybe added a splash of water, as my brownies didn't quite bind together enough in the oven


The final product is deliciously moist, with a proper chewy top. As i said, mine's a little crumbly, but still delicious - even a dubious Dikki says he wouldn't know there was courgette in it.

Give it a go, these are proper moist, chewy, chocolatey brownies, that actually do count as one of your five a day!

18.9.11

Merangry


Looking for some sunday afternoon entertainment, that wouldn't cut into our holiday spending money piggy bank, Dikki and i decided to have a meringue making contest. Who wins? You decide!


We each made our own bowl of meringue mix, following Delia's basic recipe and adding out own twist. I added a little raspberry jam to mine to make it a pretty pink with a lovely fruity flavour. I also added a drop of lemon when Dikki wasn't looking - this makes the egg white seize up more, and reach the required consistency much quicker, HA! I am a viagra dealer for meringues.

A good twenty minutes of hand whisking later (forty minutes for Dikki, HA!) we were all soft peaks and good to go


Please note how much more confident i am than Dikki is. My mix was PERFECTO! So, into the oven we go. Word to the wise, don't agree to take the bottom shelf....


So, Dikki's top shelf meringues are the cracked, caramelised looking ones, while mine are the nicely shaped but undoubtedly brown ones below (in my defence when you crack them open they are chewy and pretty in pink)

So, what do you reckon? his handicap was no lemon, mine was bottom position.

Who wins??

12.9.11

Project Nigella: Clemmie Cupcakes


This weekend i made Clemmie Cupcakes - orange cakes with orange icing (that turned out pink)

I'm calling these Clemmie Cupcakes in honour of my friend and colleague Liana, who can proudly eat two bags of clementines in one setting. There should be a prize for that.


Last week i bought a whole set of piping nozzles from eBay. First on my hitlist of fancypants overachieving icing techniques was roses. This month on Food Network they are having cupcake month, and i've watched the two minute tutorial for this in just about every ad break, it looked pretty simple, and indeed it was! For a first go i was pretty pleased with how they came out.

However, Dikki wanted a go, and it all went downhill from there. We had piped willies, worms, general mess, piping on his arm, piping on the counter. There was a lot of laughter but needless to say my beautiful batch of cupcakes didn't turn out as beautiful as expected!