Showing posts with label diy. Show all posts
Showing posts with label diy. Show all posts
4.11.12
Design Inspiration: Stylish Free Fonts
As previously mentioned, i love a well designed font. The font used makes such a huge difference to the way a written message is perceived, and there's not much i like better than discovering a new beauty to download!
I was having a read back through the well of web design inspiration that is Pugly Pixel, and found a link to Font Squirrel - a brilliant site with some great free fonts.
If you've never downloaded a font, don't be scared! It's very simple. Just click the download button, and it will appear as a zipped folder in your downloads. Open the zipped folder, open the .otf file, and on both mac and pc you should see an 'install font' button. Click it, done! If you have word or PS or whatever open at the time, you may need to close and reopen it before seeing your new font in the menu. You'll never want to use a boring standard font again!
At the moment i'm planning lots of crafty design projects, many of which include text in one way or another, so having access to some stylish fonts that convey the kind of mood i want is absolutely brilliant.
Fonts used in the image above: Lobster and Quicksand (dash)
1.7.12
How To Make Covered Buttons
Hello! Here's a simple but very satisfying mini DIY project for you. I made these jumbo covered buttons for my upholstery project, which, by the way, has begun! More on that when it's finished, but let me tell you right now, it may be a little while.
You could, of course, spruce up many wardrobe staples with jazzy new buttons. Check out Valentino's Fall 2012 collection...
mmm buttons. Here's how!
You will need:
Self cover buttons - available from all haberdashers, John Lewis, or online. They are available in plastic or metal, and a wide range of sizes. The choice is yours!
Fabric scissors
Strong thread
Fabric - you really only need a tiny bit, so you can buy a fat quarter (this will be PLENTY) or use a scrap. This fabric is leftover from a fat quarter i used for another project
1. Cut a circle from the fabric
2. Sow a loose running stitch around the edge of your circle with strong thread. Do not tie off the thread when finished.
3. Place your button on the wrong side of the fabric, and gather the thread. The fabric will pull beautifully around the button. Even out any gathered sections that have created folds on the front of the button, and tie off the thread.
4. Press the back on, push into place with a cotton reel, et voila!
This really only takes a couple of minutes per button, and gives a perfectly professional finish. A very satisfying project! I know i'll be thinking twice each time i button up my clothes now, wondering if it could get a new breath of life with new buttons. Tribal print sundress with this season's acid yellow buttons anyone?
26.6.12
Design Inspiration: Contrast Upholstery
So, we were beginning to give up hope, until we got offered this wingback, gratis! Perhaps this is exactly what we needed? We couldn't find the exact thing, so now we can make something exactly how we like! I'm planning to get cracking on re-upholstering it this weekend. I'm taking inspiration from the stunning Boujis Occasional chair from Made, pictured above. Dove grey fabric with contrast trims? Yes please!
Some more dream home bum snugglers...
via Designsponge
via apartment therapy
Kind of can't wait to get cracking on this mega DIY! Have you ever tried your hand at upholstery? Or been tempted?
5.6.12
Sugar Anenomes and Photographic Memories
It's the bank holiday weekend. We went to AppleCart Festival, we had friends round for dinner, we watched the Jubilee concert, and i made a sugarcraft anemone. Sugarcraft is brilliant, it's like play-doh for adults. You can spend half an hour making something and sticking your tongue out in concentration, and pretend you are 'skilled' instead of just 'a toddler'.
To make this little experiment i stocked up at the excellent Craft Company who delivered super quickly! I used the blossom-white sugar flower paste, which as you can see is quite pink. It comes in a resealable plastic pot, and is just soft, so you can work it a little and soften it up, shape it, and then it hardens completely in a few hours. I also got some edible glue to stick it all together, and used some black glitter flake to cover the centre (which was made of a ball of the blossom-white icing)
To shape the petals i followed Domestic Sugars excellent tutorial. I didn't have a special ball tool, i used a 1/2 tsp measuring spoon, and i used spoons to lay out the petals, but the sponge is 100% vital, i couldn't have shaped these on a solid surface!
I have so much anemone love right now
Flowers and photo by Saipua
In other news, we just confirmed that the truly awesome Chris Barber will photograph our big day! I came across his photos through work waaaaaaay before we got engaged, and loved it. So i showed the boy, and he loved it too. We've looked around, there have been a couple of super close seconds, but Chris was our first choice from the start, before we picked a venue or even thought about any other things, so we are super excited to have him on our team.
Happy dance!

10.3.12
DIY Love Letters Wall Art
Hello crafty readers! Today i'll be showing you how to make a super simple piece of wall art. I've actually had this project on the go since christmas, but i've been pretty rubbish at finishing it, even though it's simple. Just been a busy girl with other things!
You will need
- A large frame, with no back. Mine is about A1 size, and is actually an illusion - it looks like a gilt wood frame, but it's actually just a think plastic mould. A friend picked this up for me at a boot fair a couple of years ago and i've been looking for a use for it ever since! This is the perfect project for a shabby chic frame like this, so scout out your local boot fairs and charity shops!
- Embroidery thread in a variety of colours. I went for bright jewel tones, but you could of course go for a more muted pallette if you prefer!
- Sellotape
- Gold spray paint - i intended to spray the & sign gold, but my spraypaint is old and, it turns out, no longer sprays! So i've left mine bare for now.
- Letters. I got mine from ebay, they are made of mdf and cost just a couple of pounds each. However, i hear you can get really good letters made of thick cardboard at Hobbycraft, so if you live near that heaven of craftyness, go there for all of your supplies in one trip!
Choose some nice colours of thread, and begin wrapping it tightly around your letters. This is an easy but time consuming task - best done over a few evenings sitting in front of the tv! When you've wrapped a section sellotape the end down. It doesn't matter if it looks a bit messy on the back, since this will be against the wall.
Cats REAAAAAALLY love embroidery thread...
When you're all done wrapping the letters, hang them within the frame with some more thread, hang your artwork on the wall, and enjoy!
As ever, if you try any of my crafty or baking projects, let me know how you got on in the comments, or post it on your blog and send me the link! Have a great relaxing weekend
14.12.11
Home Made Christmas: DIY tissue pom-poms
I made these super easy 'snowflakes' to hang in our window. They look beautiful next to the fairy lights! Each one only takes about 5 minutes to make, here's how...
1. Cut 8 sheets of tissue paper into rectangles 30cm x 60cm (if you want your pom poms 30cm wide. You can of course make them fatter or smaller by adjusting the measurements!)
2. Lay all 8 sheets on top of eachother
3. Concertina fold them (as if you were making a paper fan) started from one of the 30cm edges, so that your finished piece of folded paper is 30cm long, and an inch or so wide
4. Tie a piece of thread around the middle of your paper, and trim the ends into semi circles
5. Now comes the fun bit! Carefully pull the sheets of paper out around the thread, making a soft spherical shape
6. Hang them somewhere lovely!
These pom poms are so pretty, it's no wonder they are popping up on lovely blogs all over the place, here's some great examples
The Sweetest Ocassion
A Beach Cottage
A Beautiful Mess
Sooooooo pretty! Have you seen any gorgeous pom poms on your internet travels lately?
10.12.11
Home Made Christmas: How to make dried orange decorations
Tis the season to be jolly! For the first time since living with my parents we have a real tree this year, so i felt that it deserved some extra special, extra fragrant, extra festive decorations!
How to make dried orange slices
Slice a bag of oranges into 1cm thick slices
place them directly onto the wire rack in the oven
Cook for about three hours on 100C
Leave to cool!
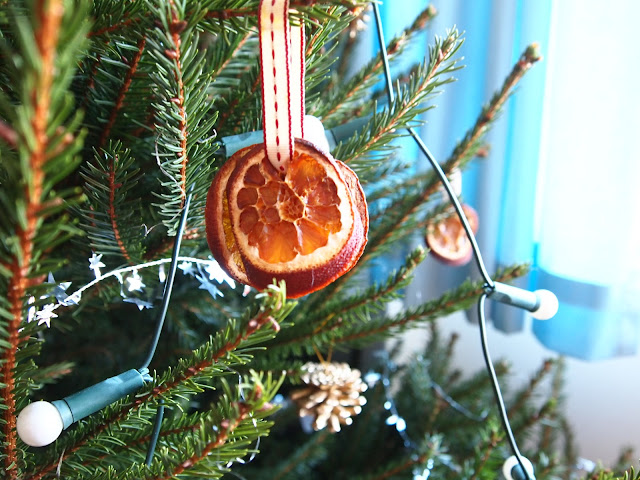
I have used these all over the house. Some of them i've threaded ribbon through and hung on the tree
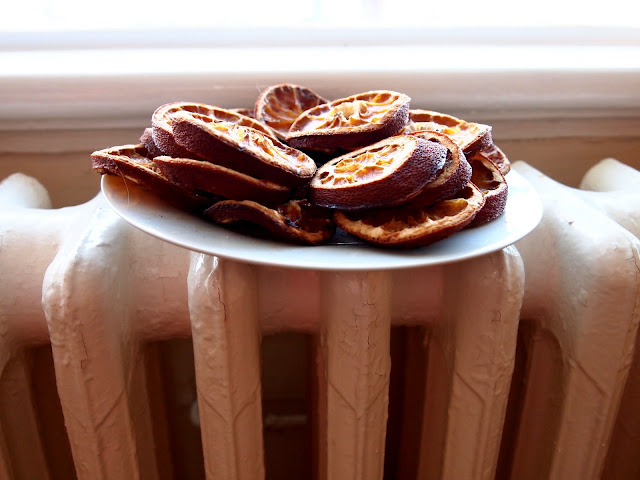
Others i have left in a bowl on the living room radiator, they smell amazing!
And i also made a super simple wreath for the front door. Here's how...
1. Cut a circle of cardboard the size of a dinner plate
2. Use a length of wood (i used a BBQ skewer, but a pencil or pen or something like that would work too!) to reinforce the top and bottom of the card. I just taped them on.
3. You can thread a length of ribbon through one piece of wood, to hang the wreath with later.
4. Using a glue gun, stick you orange slices on, each one slightly overlapping the last
5. finish it off with a bit of sparkle, and a pretty bow, and hang it on your door!
Tonight is my annual christmas tree decorating party, so i have been a busy bee making lots of festive buts and bobs. I'll post up some more simple how-tos in the next few days!
Subscribe to:
Posts (Atom)


